It's been a while that I wanted to reproduce Frank Zappa's cover album "Make a jazz noise here".
I finally decided to give it a go because I plan to build it either with 3D printing or laser cutting. But I will probably use a mix of techniques.

01/04/2026
By Anar on 01/04/2026, 00:51
It's been a while that I wanted to reproduce Frank Zappa's cover album "Make a jazz noise here".
I finally decided to give it a go because I plan to build it either with 3D printing or laser cutting. But I will probably use a mix of techniques.
22/03/2026
By Anar on 22/03/2026, 16:17
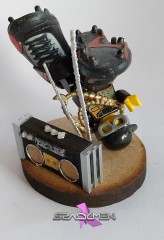
In a world of plastic and waste, recycling is an important thing and can be fun.
It can also be an art like in this serie of sculptures made out of recycled toys and materials.
05/08/2025
By Anar on 05/08/2025, 14:03 - Print
A proof of concept on using controled oozing and stringing parameters for the production of 3D printed tensegrity structures.
Could be usefull for all kind of projects where cables, tendons, muscles, or any "fiber like" 3D printed structure might be interesting.

31/07/2025
By Anar on 31/07/2025, 07:41 - Print
Stained glass traditional making is an art that exists since centuries, in which pieces of glass are arranged to form patterns, held together by strips of lead known as the "came". But special precautions should be taken when working with this metal to avoid lead contamination.
So I wondered how 3D printing and other materials could be used instead of lead...

29/07/2025
By Anar on 29/07/2025, 09:23
Being interested in "tensegrity" and "self-standing" structures, here are just a few experiments I'm working on.
Work in progress...

15/05/2025
By Anar on 15/05/2025, 09:22
For our theater play that takes place in 1920 I was in charge of making an old gramophone replica.
It didn't need to actualy work, but had to be realistic enough to convince the audience.
I made it by mixing laser cutting and engraving, 3D printing, and more traditional techniques (cardboard, wood marquetry, painting).

29/03/2025
By Anar on 29/03/2025, 20:00
During the last 2 years I spent some time at customizing my small car, a Citroën AMI 100% electric.
I's a very minimalistic tiny car that can go as fast as 45 km/h with an autonomy of 70 km.
And here "minimalistic" means that there was place for a lot of improvements...
![]()
By Anar on 29/03/2025, 07:36 - Software
Back in 2019 I discovered Rocket3F and loved it right away.
It then became my favorite 3D modeler, especially for everything organic, because of its very powerful Subdivision tools.
And I loved it so much that I bought myself a Pro V1 license.
Until I changed my laptop for a new one...
![]()
28/03/2025
By Anar on 28/03/2025, 16:52 - Generative AI
I recently tested a few AI to generate 3D models from a single image.
While the results aren't perfect, I've been completely amazed on how fast they can generate acceptable results in no time ! (compared to traditional modeling techniques)

26/03/2025
By Anar on 26/03/2025, 07:02 - Weedo Tina2
Do you want to improve Z wobling issues on your beloved Tina2 ?
Then you may like this mod...

By Anar on 26/03/2025, 06:04 - Weedo Tina2
Many Tina2 users reported me big troubles and damages to their hotend cables in the long term use.
And I'm pretty sure the culprit is the way they're doing Z homing.
That's why I created this new part.
Be gentle with your Tina2 and start changing your Z homing method... before it's too late!

17/08/2023
By Anar on 17/08/2023, 15:23 - Materials
Recently I designed a few 3D printed accessories for my car.
I knew that PLA won't be a good material due to the hot temperatures that are reached inside my car during summer.
But I decided to print them using PLA anyway (because I have quiet a few rolls) just to check that my designs were correct, and to see by myself how they will react during hot summer days.
Check out the result !

21/05/2022
By Anar on 21/05/2022, 15:56
This is the making of "Caruso", a peacock that I made out of paper mache as a theater prop.

22/02/2022
By Anar on 22/02/2022, 16:02 - Print
Being involved in a theater play that takes place in 1920, we needed an old style camera.
After searching a real one without success, I decided to make our own by combining 3D printing, woodworking and painting.
Here is the result....

16/02/2022
By Anar on 16/02/2022, 15:42 - Weedo Tina2
The filament feeder on the Tina2 is working well but I find it a bit uncomfortable. It's also very simple and doesn't offer any control on the filament griping force.
I designed these feeder upgrade parts to improve the original Tina2 feeder.

15/02/2022
By Anar on 15/02/2022, 16:10 - Weedo Tina2
I had one more free unused pin on the motherboard intended for a Y max endswitch.
I decided to use it as an output pin to drive a dedicated part cooling fan.

09/02/2022
By Anar on 09/02/2022, 16:27 - Weedo Tina2
I wanted to do this mod since I got my Weedo Tina2 3D printer.
Thanks to my firmware hack it's now possible and it works !

08/02/2022
By Anar on 08/02/2022, 16:30 - Weedo Tina2
I noticed that the Weedo Tina2 3D printer has a tendency for slight Z wobbling.
So I designed a part that completely removes it which leads to much better prints.

07/02/2022
By Anar on 07/02/2022, 16:35 - Weedo Tina2
Having now a complete Marlin firmware opens a lot of new features.
Among them there is a filament runout detection section which I think is a feature every 3D printer should have.
So it's time to add one to my beloved Weedo Tina2.

03/02/2022
By Anar on 03/02/2022, 16:39 - Weedo Tina2
After a lot of trials and errors I finally succesfully hacked the Weedo Tina2 firmware.

« previous entries - page 1 of 9